Hey friend! Let’s chat about something super important for keeping your digital life smooth and secure: your Google and Gmail account. You know, that account that pretty much runs your entire online world? Well, sometimes life happens, and you get a new phone number. Maybe you’ve moved to a new country, switched carriers, or just got a fresh SIM card. Whatever the reason, having an outdated phone number linked to your Google account can be a real headache, and honestly, a bit risky!
Think about it: Google uses your phone number for so many crucial things. It’s how they send you those verification codes when you log in from a new device, how you recover your account if you ever forget your password, and how they send important security alerts. If that number isn’t active anymore, you could find yourself locked out of your account, missing vital security notifications, or struggling to get back in during an emergency. Plus, there’s always the slight worry that someone else might end up with your old number and potentially try to access your accounts. Yikes!
The good news? Updating your phone number on Google and Gmail is a straightforward process. It doesn’t matter if you’re an Android wizard, an iPhone enthusiast, or a Windows user; these steps are pretty universal. All you’ll need is your current login details (your Google password) and, of course, your shiny new, active phone number. Ready to dive in?
Why Bother Changing Your Google Phone Number Anyway?
Sponsor Break!

We’ve already touched on it, but let’s quickly underscore why this isn’t just a “nice to do” but a “must do.” Your linked phone number acts as a crucial security layer for your Google account. It’s your digital backup plan. If you ever get locked out, it’s often the quickest way back in. Imagine this: you’re trying to log into Gmail on a new laptop, and Google sends a verification code to your old number – the one you no longer use! Suddenly, you’re stuck. That’s a frustration we can all avoid with a simple update.
Beyond recovery, an active phone number helps Google keep an eye out for suspicious activity. If they notice an unusual login attempt, they can quickly ping your current phone to confirm it’s you. Without that up-to-date contact, those important alerts might just vanish into the ether, leaving your account potentially vulnerable. So, let’s make sure your digital identity is protected and your pathways to recovery are always open.
Ready to Update? Here’s the Friendly Step-by-Step Guide!
Alright, let’s get down to business. You can do this either through the Google Account website directly or via your Gmail app. Both methods lead to the same destination, so pick whichever is most convenient for you!
Step 1: Head to Your Google Account Settings
-
Option A (Web Browser): Open your favorite web browser and go to myaccount.google.com. Make sure you’re signed in to the Google account you want to update.
-
Option B (Gmail App – Android/iPhone/iPad): Open the Gmail app on your mobile device. In the top right corner, you’ll see your profile picture (or your initial). Tap on it. From the menu that pops up, select “Manage your Google Account.”
Once you’ve done either of these, you’ll be on your Google Account management page. This is your personal hub for all things related to your account settings, and it’s designed to be clear and secure.
Step 2: Navigate to Your Personal Info
On the left-hand side menu (or sometimes at the top on mobile, you might need to swipe), you’ll see a few tabs. Look for the one that says “Personal info” and tap or click on it. This section is where you manage details like your name, birthday, and, you guessed it, your contact information.
Step 3: Find Your Phone Number
Scroll down a bit on the “Personal info” page until you find the “Contact info” section. Within that, you should see “Phone” listed, usually with your current (or old) number displayed. Give that phone number option a tap or a click.
Step 4: Edit Your Number
You’ll now see your phone number. To change it, look for a small pencil icon next to the number. That’s your “edit” button! Tap or click on it. If you have multiple numbers, you might see an option to add a new one or edit an existing one.
Step 5: Verify Your Identity (Security Check!)
Before you can make any changes, Google will ask you to verify that it’s really you. This is a crucial security step to prevent unauthorized access. You’ll likely need to enter your Google account password again. Sometimes, it might also ask you to confirm your identity on a trusted device you’re already logged into. Just follow the prompts carefully.
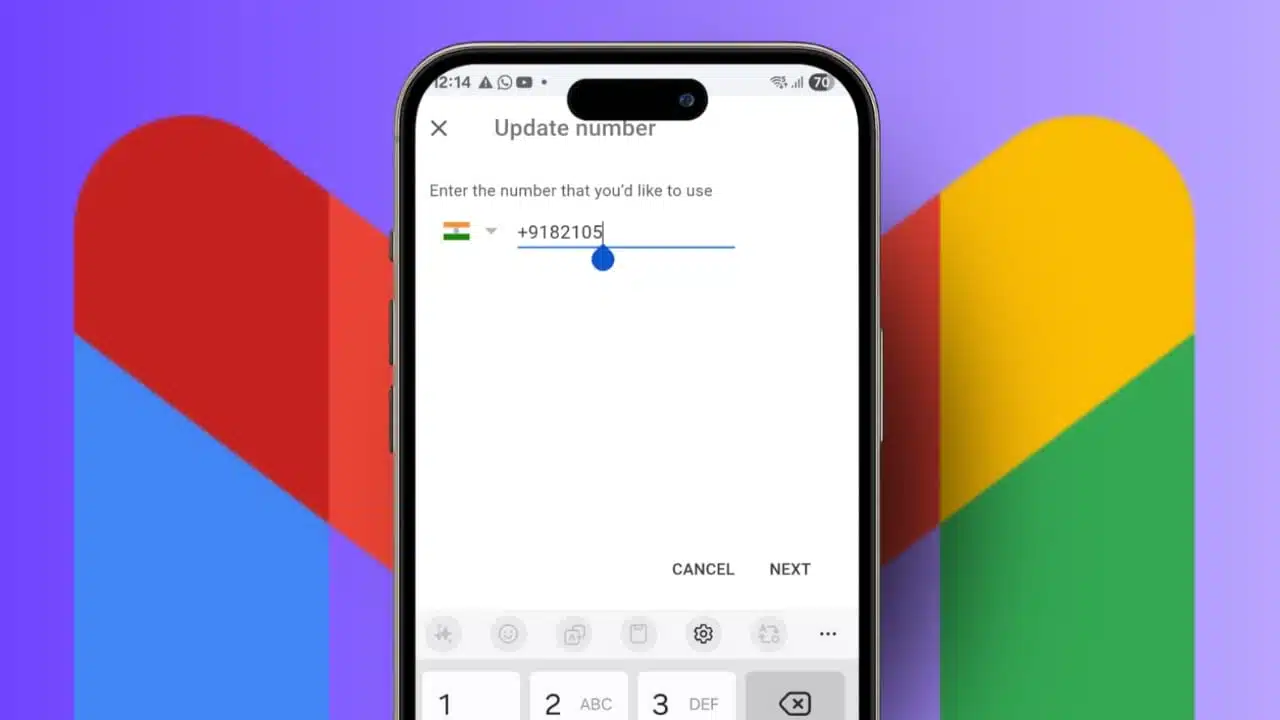
Step 6: Enter and Verify Your New Phone Number
Once your identity is confirmed, you’ll be able to enter your new phone number. Type it in carefully, double-checking for any typos! After you’ve entered it, Google will send an SMS (text message) with a verification code to this new number. Grab your phone, find that code, and enter it into the Google prompt on your screen. This step confirms that you own and have access to the new number.
Step 7: Finish Up!
Once you’ve successfully entered the verification code, you’re all set! Your new phone number will now be linked to your Google and Gmail account. You might also see an option to remove your old number, which is a good idea to avoid any confusion down the line, especially if you’ve completely stopped using it.
A Quick Heads-Up: Important Things to Remember After Your Update
While your primary Google account phone number is now updated, it’s worth noting that not every single Google service updates automatically. For instance, if you’ve separately linked a phone number to specific apps like Google Chrome for autofill purposes or Google Calendar for event reminders, you might need to update those individually. It’s a small extra step, but worth doing for complete consistency.
Also, if you manage multiple Google accounts (many of us do!), remember that you’ll need to repeat this process for each account where you want to update the phone number. Each account is handled separately. And if you’ve moved to a new country, updating your number is extra important to ensure local services and verification methods work smoothly.
Security First: A Note on Google’s Verification Process
You might notice that after you update your phone number, Google sometimes takes a little while – up to about a week – before it uses this new number for highly sensitive actions like password changes or critical account recovery requests. Don’t worry, this isn’t a bug! It’s an intentional security measure. This small delay adds an extra layer of protection, making it harder for someone who might gain unauthorized access to your account to immediately lock you out by changing critical recovery details. It’s Google’s way of giving you a buffer, just in case.
Wrapping It Up: Keep Your Digital Life Smooth!
See? That wasn’t too bad, was it? Changing the phone number linked to your Google and Gmail accounts is a small task that makes a huge difference for your online safety and peace of mind. Keeping your contact information current ensures your profile stays secure, your alerts reach you, and you always have a reliable way to get back into your account should you ever need to. So, take those few minutes, make the update, and keep your Google life running smoothly and securely. Your future self will thank you!
Your Burning Questions Answered: FAQ
Q1: Why is my phone number so important for my Google account?
A1: Your phone number acts as a critical security and recovery tool. It’s used for two-factor authentication (sending verification codes), helping you reset your password if you forget it, and sending you security alerts about unusual activity on your account. Without an active number, you could face login issues or miss important security notifications.
Q2: I’m not getting the SMS verification code. What should I do?
A2: First, double-check that you entered the new phone number correctly in your Google account settings. Ensure your phone has good signal and isn’t blocking messages from unknown numbers. Sometimes, there can be a slight delay, so wait a few minutes. If it still doesn’t arrive, you might see an option to resend the code or try an alternative verification method if available.
Q3: Can I have multiple phone numbers linked to my Google account?
A3: Yes, Google often allows you to add multiple recovery phone numbers. This can be a great idea for extra security, providing you with more options if you lose access to one specific number. You can usually manage these options in the “Phone” section of your Personal Info settings.
Q4: How long does it take for the new number to be fully active for all Google services?
A4: Your new number is usually updated immediately for basic verification. However, for highly sensitive actions like changing your password or critical account recovery, Google may take up to a week to fully integrate the new number. This is a security measure to protect your account.
Q5: What if I don’t have access to my old phone number anymore?
A5: If you no longer have access to your old number and haven’t updated it, you’ll still be able to change it as long as you can verify your identity through other means (like your password and potentially a recovery email). Google’s recovery process is designed to help you regain access even without the old number, but it might take a few extra steps. Always try to update your number *before* you lose access to the old one if possible!